
Proper CSS Formatting
This article will cover CSS formatting, syntax, indenting, how priority works, how to target proper classes, etc. — as well as when to use inline CSS vs Divi Module vs Child CSS.
Terminology
Rule declaration
A “rule declaration” is the name given to a selector (or a group of selectors) with an accompanying group of properties.
selector {
	property: value;
}
Selectors
In a rule declaration, “selectors” are the bits that determine which elements will be styled by the defined properties. Selectors can match HTML elements, as well as an element’s class, ID, or any of its attributes (e.g., an href on an anchor element).
Read more about targeting attributes in this CSS Tricks article.
Properties
Finally, properties are what give the selected elements of a rule declaration their style. Properties are key-value pairs, and a rule declaration can contain one or more property declarations.
Formatting
- Use a hard tab (which is equal to 4 spaces) for indentation. Use the tab key where possible (not the spacebar). In some cases, the tab key may not indent — so in that case, you can use 4 spaces.
- Try to not use ID selectors in CSS rules unless necessary to override priority.
- While it is possible to select elements by ID in CSS, it should be avoided when possible. ID selectors introduce an unnecessarily high level of specificity to your rule declarations.
- When using multiple selectors in a rule declaration, give each selector its own line.
- Put a space between the selector and the opening curly brace { in rule declarations
- In properties, put a space after (but not before) the : character.
- For values that are set to zero, there is often no need to add the units (e.g., 0px can just be 0).
- Each property declaration should be on its own line.
- Always add a semi-colon ; at the end of each property declaration.
- Put closing curly braces } of rule declarations on a their own new line.
- Put blank lines between rule declarations… unless you feel they are logically related.
.one,
.selector,
.per-line {
	color: red;
	padding-right: 0;
}<br>
The main goal here is to be consistent and well structured, to make your code easier to read and maintain.
Media query formatting
- Rules within media queries should be indented, so it’s easy to understand the structure — and where the media query begins and ends.
@media (max-width: 638px) {
	.checklist-columns-2 ul li,
	.checklist-columns-3 ul li,
	.checklist-columns-4 ul li {
		margin-bottom: 20px !important;
	}
	.checklist-columns-2 ul li:last-child,
	.checklist-columns-3 ul li:last-child,
	.checklist-columns-4 ul li:last-child {
		margin-bottom: 0 !important;
	}
}
Comments
When using a amount of CSS to overhaul the look of a website, it is ideal to add comments to your CSS rules, or even to certain property declarations.
Utilizing comments to separate chunks of rules is ideal as it helps to categorize them when quickly scrolling through the CSS.
Additionally, adding more detailed comments about what a specific rule is doing can be beneficial when debugging or understanding what a particular rule is affecting.
Example: https://i.gyazo.com/29edc13bb7574e26156ca9ca56f1742e.png
- For large chunks of CSS, add a start and end comment by something such as:
/* -- CONTACT FORM -- */
.your-selector {
	...
}
/* -- END CONTACT FORM -- */
- Prefer comments on their own line, with long comments broken into multiple lines.
- Write detailed comments for code that isn’t self-documenting, by using something like:
/* force search form to be full width always */
- Don’t leave others guessing as to the purpose of uncommon or non-obvious code.
Priority, Specificity, Order, and Targeting
In many cases, the use of !important isn’t necessary, unless the rule you’re trying to override is already using !important.
If not, you should be able to override theme and plugin CSS by writing a more “specific” rule — one that would have a higher priority. Keep in mind that not only does the order of your rules matter (remember the C in CSS is for Cascading), but so does the number of selectors you add to your rule.
For example, using an ID for your selector will cause the rule to have a higher priority than if that rule was only using a class instead.
You can read up on these in the following articles:
Targeting
When writing CSS, your rules may get used in more areas that you realize.
Keep in mind that just because you’re trying to style one particular element, it may end up affecting other ones — if your rule is generic.
- For example, if only trying to target a form submit button/input of a single form, you should probably add a class (or ID) to that form’s wrapper. Otherwise, you may end up styling all submit buttons/inputs on ALL forms… which may not have the desired outcome. Especially if a new form is added later on.
Inline vs Module vs Stylesheet
Stylesheet
The bulk of your CSS will likely reside in the child theme’s CSS. This should be added to Appearance > Editor > style.css
- This is the child theme’s external CSS file, and is the recommended location for most custom CSS.
Module
However, with that said, Divi offers tons of styling options within each Divi Builder Module.
When it makes sense, you should utilize the module’s sliders, formatting, color pickers, etc. for tweaking the appearance of a particular module. If a Module offers a setting for it, feel free to use it.
Although, it may not make sense to (for example) manually adjust every single Blurb heading color within the Module settings — if you’re trying to change that color site-wide.
In this case, you may find that it makes more sense to just target all Blurb headings by adding a rule within the child theme’s stylesheet. This is a judgement call. But also keep in mind that Divi does offer the ability to globallychange certain aspects of Modules, by going to Divi > Module Customizer.
Keep in mind that styling should be somewhat easy to update later. So if the heading color of ALLBlurbs needs to change later, it will be more ideal to update a single value within the child theme’s stylesheet, as opposed to going into every single Blurb Module and updating the color picker in each one.
As far as using the custom CSS area within Modules (Module Setting > Advanced > Main Element), this should really only be used if trying to tweak the styling of a particular module.
It wouldn’t be efficient to use the CSS in this area, if applying the same rules to multiple modules. In this case, perhaps adding a CSS Class instead would be more beneficial — for quickly applying and editing styling later on.
Inline
In some cases, you may need to tweak the styling of certain text within a Text Module. In cases like this, you may need to resort to using inline styling.
For example, if only trying to change the font color of a particular word, you would have to wrap that word in a span tag and add either an inline style or a class to it.
This is OK.
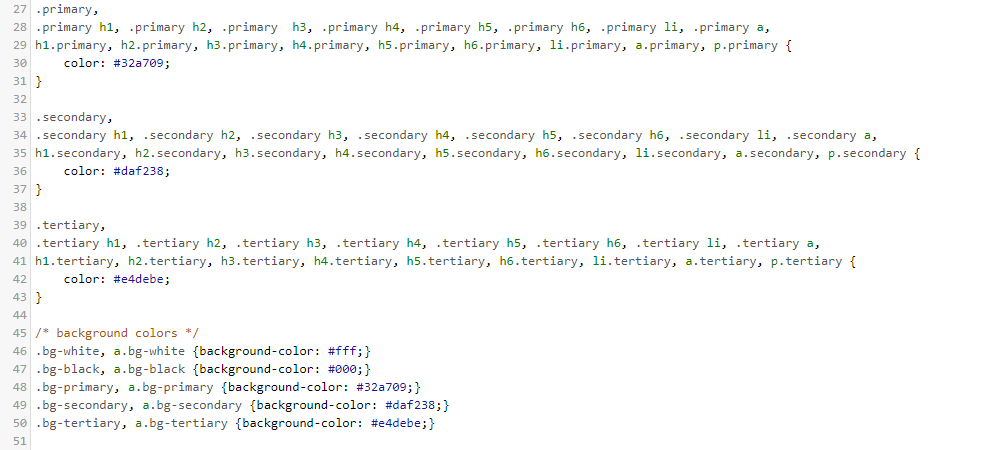
If changing the color, it may be beneficial to utilize some of the pre-existing color classes (found in the stylesheet) such as primary, secondary, tertiary ( screenshot) so that you can easily update colors later without having to manually go into each Module again.
All in all, you should be consistent, neat and clear in the CSS writing — so that it can be easily understood and managed.